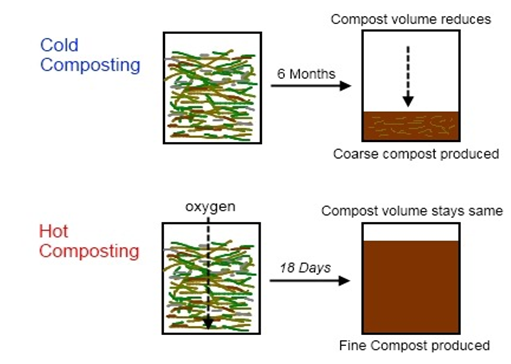
Regular composting, also known as “cold composting”, involves placing a variety of organic materials in a compost bin, enclosure, or even just in a large heap, and leaving it there until it breaks down several months later. It’s a very slow process and typically takes 6 to 12 months. It can be speed up by turning the compost, which is, moving around the material at the bottom of the heap to the top and vice versa to mix it up and get more oxygen in there, but it’s still a long wait.
The other approach to composting is “hot composting”, which produces compost in a much shorter time. It has the benefits of killing weed seeds and pathogens (diseases), and breaking down the material into very fine compost. In contrast, cold composting does not destroy seeds, so if you cold compost weeds, any weed seeds will grow when you put the compost into the garden.
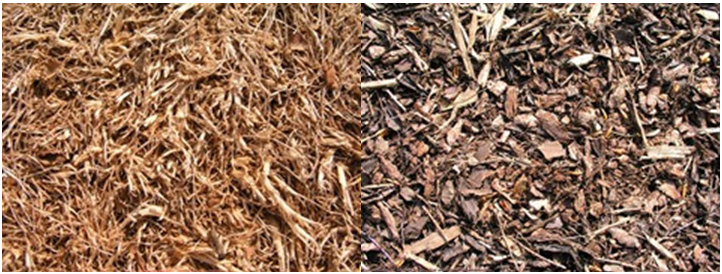
Cold composting does not destroy pathogens either, so if you put diseased plants into your cold compost, the diseases may spread into the garden, hence the common advice not to (cold) compost diseased plants. The other issue with cold composting is that you end up with lots of large pieces left over in the compost when the process is completed, whereas hot compost looks like fine black humus (soil).
One hot composting method, the Berkeley method, developed by the University of California, Berkley, is a fast, efficient, high-temperature, composting technique which will produce high quality compost in 18 days. DHARASTAN's CompoSTOP process deploys the Berkley method.
The requirements for hot composting using the Berkley method are as follows:
Composting Materials and the Carbon-Nitrogen Balance
In the hot composting method, the ratio of carbon to nitrogen in the compost materials needs to be between 25 to 30 parts carbon to one-part nitrogen by weight.
This is because the bacteria responsible for the composting process require these two elements,in these proportions, as nutrients to construct their bodies as they reproduce and multiply. This is because the bacteria responsible for the composting process require these two elements, in these proportions, as nutrients to construct their bodies as they reproduce and multiply.

| Browns= High Carbon | C:N |
| Wood Chips | 400:1 |
| Cardboard, Shredded | 350:1 |
| Sawdust | 325:1 |
| Newspaper, Shredded | 175:1 |
| Pine Needles | 80:1 |
| Corn Stalks | 75:1 |
| Straw | 75:1 |
| Leaves | 60:1 |
| Fruit Waste | 35:1 |
| Ashes, Wood | 25:1 |
| Peanut Shells | 35:1 |
| Greens = High Nitrogen | C:N |
| Garden Waste | 30:1 |
| Weeds | 30:1 |
| Green Wood | 25:1 |
| Hay | 25:1 |
| Vegetable Scraps | 25:1 |
| Clover | 23:1 |
| Coffee Grounds | 20:1 |
| Food Waste | 20:1 |
| Grass Clippings | 20:1 |
| Seaweed | 19:1 |
| Horse Manure | 18:1 |
| Cow Manure | 16:1 |
| Alfalfa | 12:1 |
| Chicken Manure | 12:1 |
| Pigeon Manure | 10:1 |
| Fish | 7:1 |
| Urine | 1:1 |
Day #1
Mix together ingredients by laying then in alternating thin layers of “greens” and “browns”.
Wet the compost heap down very well so it is dripping water out of the bottom and is saturated. Put activator culture by spreading it out with water evenly over the material to be composted.

Day #4
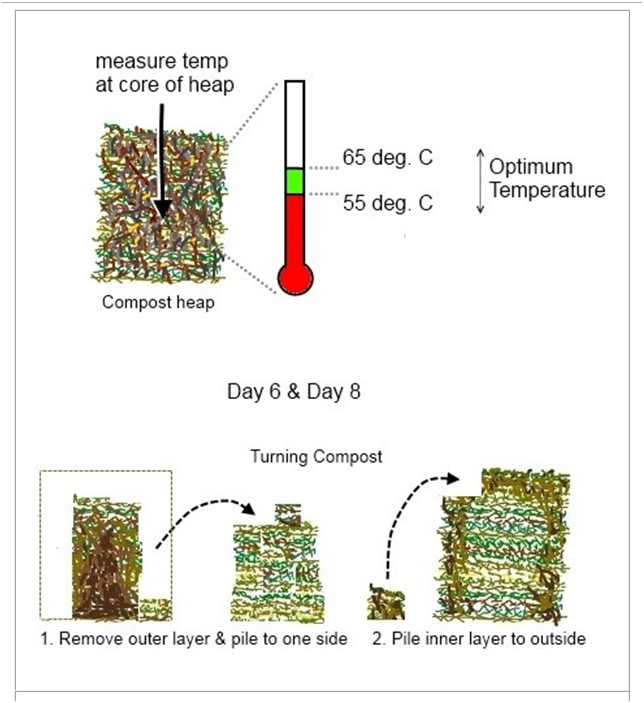
Turn the compost heap over, outside turned to inside, inside turned to outside.
To explain in more detail, when turning compost, move the outside of the pile to a spot next to it, and keep moving material from the outside to the new pile. When you’re done, all the material that was inside will be outside and vice versa.
Ensure that moisture stays constant. Put gloves on and squeeze a handful of the compost materials, should only release one drop of water, or almost drips a drop.
If it gets too wet, can spread it down, or open a hole about 3-4” wide with the handle of the pitchfork, or put sticks underneath for drainage.

Day #6 and Day #8
The compost heap should reach its maximum temperature on these days. As a simple guideline, if you can put your arm into the compost up to the elbow, then it is not at 50 degrees Celsius, and is not hot enough. Best to use a compost thermometer or a cake thermometer.
Need optimum temperature of 55-65 degrees Celsius. At temperatures over 65 degrees Celsius a white “mould” spreads through the compost, which is actually ”fire blight”, an anaerobic bacteria. Temperature peaks at 6-8 days and gradually cools down by day 18.
Turn the compost heap over every second day (on day 6 and again on day 8).
If the compost pile starts coming down in size quickly, there is too much nitrogen in the compost.
To heat up the compost faster, a handful of blood & bone fertiliser per pitchfork when turning speeds it up.
If it gets too hot and smelly and goes down in size, it has too much nitrogen, need to slow it down, throw in a handful of sawdust per pitchfork when turning.
Using this system, the Berkley method, methane is released from the compost.
Day #10 to Day #18
Continue to turn the compost every 2nd day

Day #18
Just warm, dark brown, smells good.
When earthworms move into the compost, you know it is finished and ready, because it’s cooled down and full of nutrients!

Some important points to note: